-
Shop
- Adidas
- Advanced Technologies
- AI Skills Mastery 2026 Collection
- Astrology & Tarot Products
- Beauty
- Beauty Guides Collection
- Best-Sellers
- Car Accessories
- Confidence
- Dating & Social Skills
- Digital Resources
- AI & Technology
- AI Skills
- Budgeting & Saving
- Car Buying & Ownership
- Cozy Feast Collection
- Electronics & Technology
- Emotional Intelligence
- Entrepreneurship & Business Growth
- Financial Education
- Financial Independence
- Financial Mindset & Psychology
- Goal Setting
- Hobbies
- Home Styling & Organization
- Kitchen & Recipes
- Leadership
- Mindfulness
- Mindset
- Motivation
- Online Business
- Parenting & Child Development
- Pet Lifestyle & Wellness
- Positive Thinking
- Productivity
- Self Confidence
- Sleep Improvement
- Smart Life with AI
- Stress Management & Relaxation
- Travel Planning
- Yoga & Fitness
- Yoga & Mind-Body Practices
- Education & Learning
- Family & Parenting
- Fashion
- Alexander McQueen
- Bags
- Bags & Wallets
- Balenciaga
- Belts
- Blazers
- Bottega Veneta
- Brunello Cucinelli
- Burberry
- Chanel
- Chloé
- Dior
- Dolce & Gabbana
- Dresses
- Etro
- Fendi
- Gucci
- Hats & Hair Accessories
- Hoodies & Sweatshirts
- Jacquemus
- Jil Sander
- Keychains
- Kiton
- Luggage
- Miu Miu
- Off-White
- Outerwear
- Prada
- Rick Owens
- Saint Laurent
- Shoes
- Socks & Tights
- Sweaters & Cardigans
- The Row
- Tom Ford
- Tops & Shirts
- Valentino
- Valentino Garavani
- Versace
- Vivienne Westwood
- Watches
- Fashion Accessories
- Furniture
- Gadgets
- Health & Beauty
- Health & Wellness
- Home & Garden
- Home Supplies
- Jewelry
- Kids & Babies
- Kitchen
- Kitchen Best-Sellers
- Nike
- Patio, Lawn & Garden
- Personal Growth
- Personal Style & Fashion
- Pet Care
- Pet Supplies
- Pets
- Smart Home Living Guides
- Sport & Outdoors
- Stress Relief & Relaxation
- Super Deals
- TikTok Growth & Monetization Mastery
- Travel
- Travel & Adventure
- Wealth
- Wellness
- Popular
- Best deals
Reusable Silicone Popsicle Mold Set: Easy-Release Pops
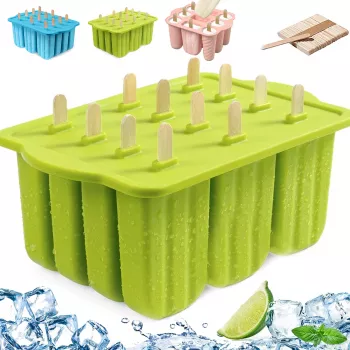
Reusable Pops for Everyday Freezer Snacks
Homemade ice pops make it easier to control ingredients, cut down on single-use packaging, and keep a ready-to-grab freezer treat on hand for kids and adults. A flexible silicone mold set takes the guesswork out of portions, helps pops release cleanly, and makes batch prep feel simple—whether you’re going fruit-forward, adding yogurt for creaminess, or freezing electrolyte pops for hot afternoons.
If you want a set that’s built for repeat use and quick turnaround, the Reusable Silicone Popsicle Mold Set with 12 Easy-Release Ice Pop Trays & 50 Sticks is designed to keep the process straightforward from fill to release.
What Comes in the Set
This set is geared toward families, frequent snack-preppers, and anyone who likes to make multiple flavors at once.
- 12 easy-release silicone ice pop trays designed to flex for quick removal
- 50 sticks included for repeat batches and parties
- Reusable design intended to replace disposable cups, wrappers, and single-use molds
- Built for make-ahead freezer snacks: prep once, freeze, and grab as needed
Set Overview
| Item | Quantity | Why it matters |
|---|---|---|
| Silicone ice pop trays | 12 | Batch-making for families, gatherings, and weekly meal prep |
| Sticks | 50 | Extra sticks support frequent use and quick turnaround between batches |
| Easy-release format | Yes | Flexibility helps reduce cracking and messy removal |
Easy Release: How Silicone Helps Pops Come Out Cleaner
One of the biggest frustrations with frozen treats is the release step—especially with lower-sugar blends that freeze very firm. Silicone helps by letting you loosen the pop mechanically instead of relying on lots of warm water.
- Flexible walls allow gentle bending to loosen frozen pops without running the mold under hot water for long
- Reduced sticking compared with rigid plastic molds, especially for lower-sugar mixes that freeze harder
- Helps keep shaped pops intact (useful for layered recipes or mix-ins like berries)
- Tip: wait 1–2 minutes at room temperature before releasing if the pop feels firmly stuck
For food-contact products, it’s also smart to stick with materials intended for that purpose. The U.S. Food & Drug Administration provides background on food contact substances, including how food-contact materials are regulated.
Quick Start: Fill, Freeze, Release
A consistent routine helps pops freeze evenly and slide out with less effort. Here’s a simple workflow that works well for fruit blends, smoothie mixes, and creamy bases.
- Prep the base: blend fruit, juice, yogurt, or a smoothie until smooth; strain if seeds are unwanted
- Fill evenly: leave a little headspace to allow expansion during freezing
- Insert sticks: keep sticks centered for comfortable holding and balanced pops
- Freeze flat: place molds on a stable, level surface in the freezer to prevent uneven shapes
- Release gently: flex the silicone to break the seal and slide the pop out
If you’re stocking up for the week, general freezer best practices help preserve flavor and texture over time. The USDA shares practical guidance on freezing and food safety, including how freezing affects foods and quality.
Recipe Ideas That Work Especially Well in Silicone Molds
Silicone molds handle a wide range of bases—thin juices, thicker purées, and creamy dairy or non-dairy blends. A few crowd-pleasers:
- Fruit-and-juice pops: orange + mango, strawberry + lemonade, watermelon + lime
- Yogurt pops: Greek yogurt + honey + berries (swirl for a marbled look)
- Creamy dessert pops: coconut milk + pineapple, chocolate milk + banana
- Hydration pops: diluted sports drink or coconut water with citrus slices (freeze mix-ins near the center for easier release)
- Layered pops: freeze the first layer 30–60 minutes, then add the next layer to keep clean stripes
For mix-ins like berry pieces or mini chocolate chips, smaller is usually better—big chunks can create weak points that make a pop more likely to tear during release.
Cleaning, Storage, and Keeping Odors Out
Silicone is convenient, but it can hold onto odors if it sits too long or is stored next to strong-smelling foods.
- Wash promptly after use to prevent lingering flavors from fruit acids and sweeteners
- Use mild dish soap and warm water; for strong odors, soak briefly in a baking soda solution and rinse well
- Let molds dry completely before stacking to avoid trapped moisture
- Store away from strong-smelling foods in the freezer; silicone can absorb odors over time
- Keep sticks together in a clean container or bag so they stay ready for the next batch
A small habit that helps: once pops are fully frozen and released, store them together in a sealed freezer bag or container so the molds can be cleaned and put away immediately.
Ingredient and Freezing Tips for Better Texture
Texture is where homemade pops can go from “fine” to “favorite.” Small formula tweaks make a noticeable difference.
Who This Set Fits Best
More In-Stock Picks
- Reusable Silicone Popsicle Mold Set with 12 Easy-Release Ice Pop Trays & 50 Sticks
- Calvin Klein Jeans Light Blue Cotton T-shirt for Men
- Luxury Retro French Romantic Copper Crystal Wall Lamp
FAQ
How do you get popsicles out of silicone molds without breaking them?
Let the mold sit at room temperature for 1–2 minutes, then gently flex the silicone to loosen the sides before pulling the pop straight out. Avoid aggressive twisting, especially with low-sugar mixes that freeze very firm.
Can you use yogurt or milk-based mixtures in silicone popsicle trays?
Yes—blend until smooth for a creamier texture, and consider adding fruit or a small amount of sweetener to reduce iciness. Freeze the molds on a level surface so dairy-based pops set evenly.
How do you prevent silicone molds from holding onto freezer odors?
Wash and fully dry the molds after each use, then store them away from strong-smelling foods. An occasional baking soda soak can help neutralize lingering odors before the next batch.


Leave a comment